
Qosium Node Manager
Qosium Node Manager is the primary tool to control Qosium Node. It runs over a web server, so use your web browser and connect to Qosium Node to access Qosium Node Manager.
Contents
1. General #
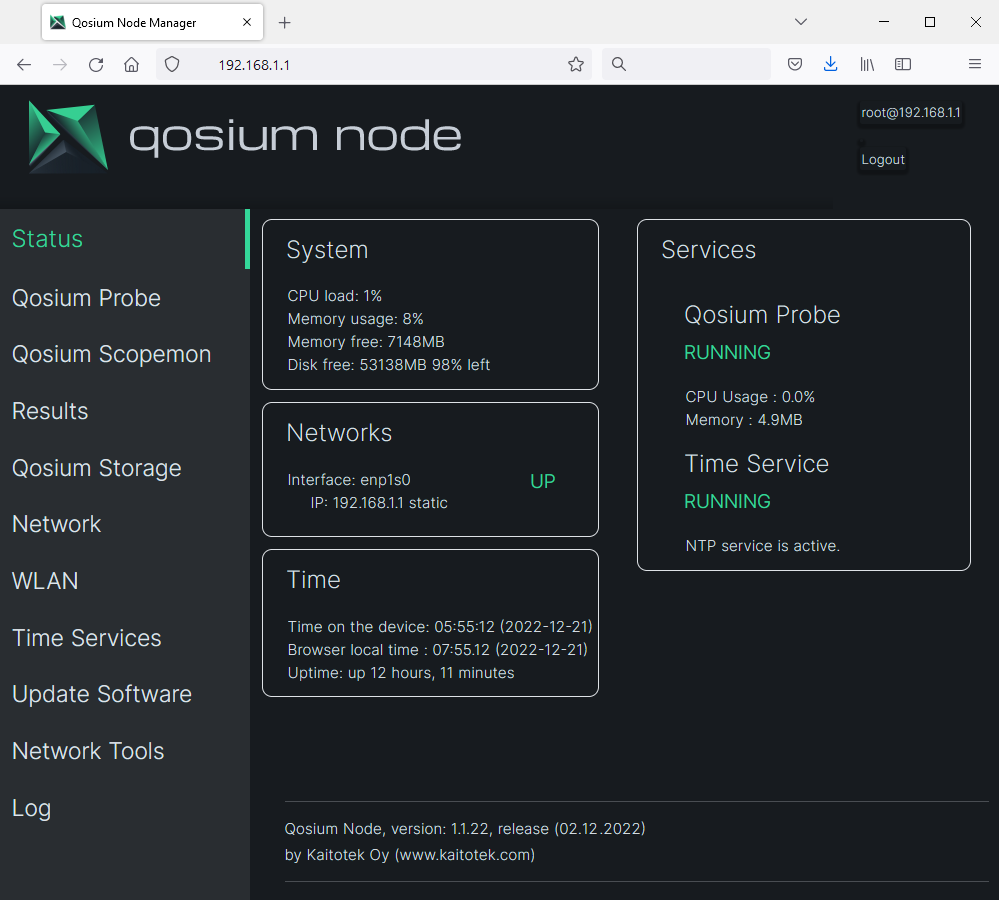
Once you log in to Qosium Node Manager, you land on the Status leaf, looking like this:
In the next chapter, we go through the leafs available.
2. The Control Leafs #
2.1. Status #
The Status view, shown in the figure above, displays important overall information. The visible windows are
- System: basic system information, including CPU, memory, and disk status
- Networks: shows what interfaces are up and connected
- Time: Device time, browser (local caller) time, and uptime. Note that, by default, time zones are not activated on the device.
- Services: Qosium Probe status with resource usage and time service status
2.2. Qosium Probe #
As the name indicates, this leaf is about Qosium Probe sitting in the device. The visible windows are:
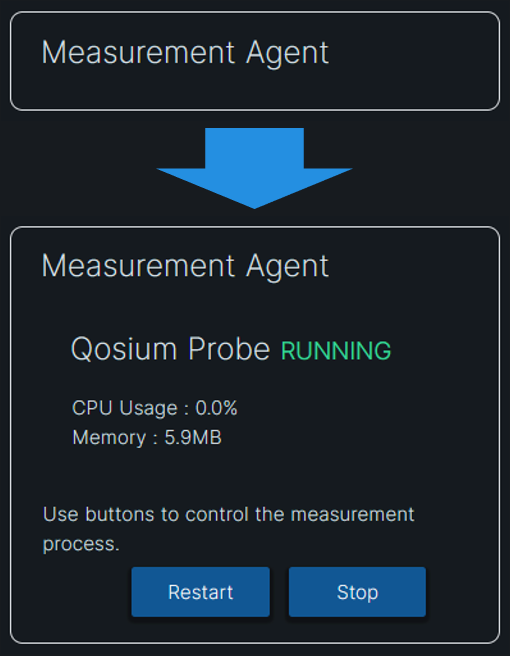
- Measurement Agent: Qosium Probe’s status with controls to restart/start and stop Probe
- Settings: View Qosium Probe’s current setting and see its log. You can also download Probe’s initialization file and send modified configurations back.
To modify Qosium Probe’s configuration:
- Download the current settings by pressing Download .ini.
- Note: if you already have the initialization file ready, you can skip this and the following step.
- Modify the just downloaded initialization file locally with a plain text editor.
- Use the Browse… button to locate your modified initialization file.
- Press Update Settings to activate the new configuration to Probe.
- That will restart the Probe, taking some time.
- Check the Qosium Probe’s status so that it eventually returns to the running state. If not, for some reason, press Restart.
- If Probe still does not activate, check the log. It is possible that some modified parameter has an unacceptable value.
Please note that some of the windows can be collapsed and expanded. The figure below shows an example of Measurement Agent window when it is collapsed. To expand the window, move your mouse over it and click the left button.
2.3. Qosium Scopemon #
The Qosium Scopemon leaf lets you control the measurements by using Qosium Scopemon. When entering here for the first time, there are no measurements; thus, there is only a single tab available: Overview. It shows some instructions in the first window and the available network interface indices of the Node device in the next. The indices are needed when forming a measurement by editing the Scopemon configuration file manually.
Create a new measurement by clicking the + sign next to the Overview tab:

The measurement creation wizard opens, letting you name the measurement and set its type. Once you are ready, click Create. Clicking Ok takes you back to the Overview tab, and now you can see that a new tab of your newly created measurement has appeared, now called “my_measurement”:

Entering a measurement tab shows you the status of the measurement and its main parameters and gives you several controls:
- Start the measurement
- Run the measurement as a managed service: the measurement is started every time with the device.
- Stop an ongoing measurement
- Show Scopemon log: handy for checking if something went wrong
- Edit the measurement here with the local editor.
- Delete the measurement
In addition, there is a window: Scopemon configuration file. It allows you to download and set a Scopemon configuration file edited elsewhere. That is sometimes useful since the Node’s local Scopemon configuration editor contains only the main parameters. In addition, the newer versions of Qosium Scope allow you to create Scopemon configurations very easily.
2.4. Results #
When you measure using the local Qosium Scopemon, the Results leaf shows the result files stored in the device. You can sort the results according to name, creation time, and file size by clicking the respective column identifier button.
The results can be accessed simply by clicking the desired file. It will be downloaded to your computer, where you can analyze it further. The files are in the same CSVComma-Separated Values
Originally CSV was only about values that were separated by commas, but nowadays the separation mark can also be something else like a semicolon.-format as always with Qosium.
To delete a result file, press the Remove button at the end of the results file line.
2.5. Qosium Storage #
If you have bought the extended Qosium Node device, QMNO-011, then you also have Qosium Storage, and this leaf shows its status information of it. You can control all three Qosium Storage-related services: the Results Receiver, Storage Portal, and the database. In addition, you can access the log of each.
You can access Qosium Storage using the link after Web Access.
2.6. Network #
2.6.1. Interfaces #
The Network leaf shows the information on the network interfaces and lets you control them.
Expand the interesting interface by clicking the left mouse button over it. There you see information on the interface, including its speed. Press Edit to modify the interface settings.
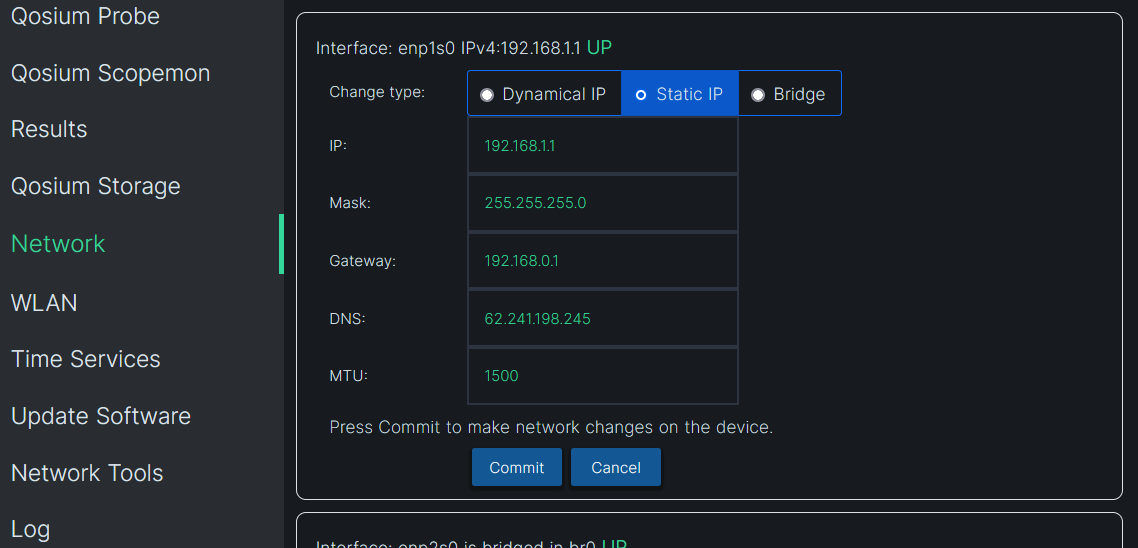
In addition to typical network settings, you can select interfaces to be bridged. By default, the two parallel network interfaces at the device’s side are in the bridged mode. You can remove the bridging or change the interfaces in the bridge. You can bridge only two network interfaces at a time. Click Commit to save the changes.
2.6.2. Port Forwarding #
Below the network interfaces, you have the active port forwarding rules visible. You may enable, disable, and remove the rules. To create a rule, press New below the rule window.
2.7. WLAN #
When your Qosium Node device is equipped with a WLAN interface, this is where you control it. You can also access the WLAN log.
2.8. Time Services #
This important leaf lets you configure the clock synchronization method of Qosium Node. Proper clock synchronization is the essential requirement for accurate one-way delay measurements. The configuration has been made easy – typically, these setting can only be modified in the command line.
Two clock synchronization methods are available: NTPNetwork Time Protocol
A very common protocol for synchronizing the clocks of devices across a network. and PTPPrecision Time Protocol
A protocol for synchronizing the clocks of devices across a network. The reached synchronization accuracy is typically considerably better than with NTP.. Select one of them for the local clock synchronization. While PTP provides much better accuracy, NTP has broader support. In this leaf, you can edit the setting of these, start and stop the services, and check their status. When editing a setting, press Commit to enable the changes. That will also restart the respective service, and the new settings come into effect.
In addition to the local clock synchronization, you can distribute the clock forward using either NTP or PTP. To do this with NTP, enable the NTP server in the settings. To do this with PTP, enable it in Master mode. While NTP can be a client and a server simultaneously, PTP can only be set either to receive clock information (Slave) or to distribute it (Master).
You can also configure a GNSSGlobal Navigation Satellite System
A general term under which all the different global satellite navigation systems (e.g., GPS, GLONASS, Galileo, BDS) fall. clock as the source if you have the hardware. That provides the best timing synchronization accuracy, assuming you have an unobstructed sight of the sky, allowing good signal from many satellites. When you take GNSS with PPSPulse per second
A square-like electrical signal that is used in accurate clock synchronization timing synchronization into use, it will override your NTP client settings, as the NTP daemon tunes the system clock based on the GNSS and PPS. Please note that when you connect GNSS for the first time after a while, the cold start procedure can take over 10 minutes before you start getting PPS, so be patient.
Read more about clock synchronization here.
 Don’t run NTP as a client and PTP in the slave mode concurrently! That will ruin the synchronization performance as they both try to twist the system clock differently. If you have accidentally done this, a warning will be shown in the Status leaf in the context of Time Service.
2.9. Update Software #
The update of Qosium Node software can be carried out in two different ways. Automatic update is the recommended way, which looks for the latest software packages from Node’s package repository online and lets you decide if you want to proceed with the upgrade.
- Press Check updates button to look for updates.
- If there are upgradable packages, they are listed and you can proceed to update them.
- If there is a Linux kernel upgrade also available, the kernel is not upgraded automatically over the web management, but instructions to carry out that update manually over an SSH connection is given.
To update software manually for specific packages:
- Access first your Kaitotek account and download the desired update package to your local computer if not already done.
- Go back to Qosium Node Manager’s Update Software leaf. Browse the package on your local computer by clicking Browse under Transfer software packages.
- Press Transfer file to upload it to Qosium Node. The status of the transfer is shown at the bottom part of the page.
- After successful transfer, wait for a while, and the package appears in the Available install packages list.
- Install the package by pressing Install. You can remove the gratuitous packages by pressing Remove.
- After successful installation, it might be wise to reboot the device: click Reboot.
We give guarantees only to software packages distributed by us.2.10. Network Tools (including network emulation) #
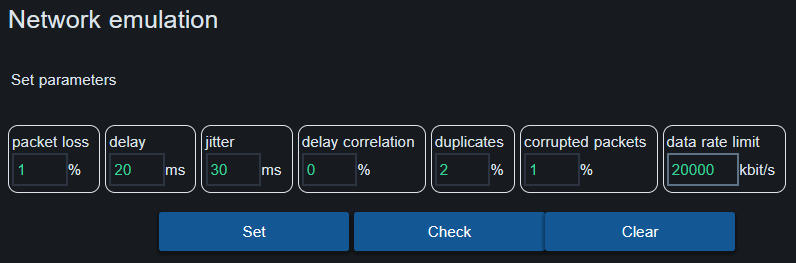
This leaf has some handy network tools. The most interesting one is the easy network emulation control, which is used to set network impairments for the interfaces connected to the bridge. You can use this tool to mimic a bad network connection and, e.g., test your applications on what kind of conditions they tolerate. All impairments set are bidirectional.
In addition, you can run a ping test to check the availability of a remote device.
2.11. Log #
This leaf lets you take a glance at Qosium Node’s operational logs. The available log types are System Log and Journal.
Glossary >
Comma-Separated Values
Originally CSV was only about values that were separated by commas, but nowadays the separation mark can also be something else like a semicolon.
Qosium, for example, uses tabs as separation marks in its CSV-formatted results files.
Network Time Protocol
A very common protocol for synchronizing the clocks of devices across a network.
Precision Time Protocol
A protocol for synchronizing the clocks of devices across a network. The reached synchronization accuracy is typically considerably better than with NTP.
Global Navigation Satellite System
A general term under which all the different global satellite navigation systems (e.g., GPS, GLONASS, Galileo, BDS) fall.
Pulse per second
A square-like electrical signal that is used in accurate clock synchronization