
GNSS Setup
In Linux, GNSS positioning is enabled by gpsd and GNSS-based time synchronization is enabled by ntp or chrony. The following guide expects that you have a compatible GNSS receiver.
Contents
1. Prerequisites #
Using GNSSGlobal Navigation Satellite System
A general term under which all the different global satellite navigation systems (e.g., GPS, GLONASS, Galileo, BDS) fall. for timing is a two-phased process. First, to get coarse clock synchronization within the correct second, the full time is taken from the NMEA messages fed by the GNSS device. Then, the PPSPulse per second
A square-like electrical signal that is used in accurate clock synchronization signal is used to fine-tune clock synchronization within one second, reaching even microsecond-level accuracy. You could also take the full time from another source, like that provided with NTPNetwork Time Protocol
A very common protocol for synchronizing the clocks of devices across a network., but since GNSS also delivers the full time, it is convenient to use that.
To start with, you need a compatible GNSS unit. Any GNSS with PPS output that works in Linux should apply. However, if you did not purchase the GNSS unit from Kaitotek, modifications to the configuration may be needed to match with the wiring of the GNSS unit.
The following packages need to be installed (Ubuntu):
- gpsd
- ntp or chrony
- setserial
- pps-tools (optional, recommended for debugging problems)
- gpsd-clients (optional, recommended for debugging problems)
You need ntp or chrony with PPS clock support. By default, all newer ntp and chrony implementations should support PPS. Bear in mind that ntp and chrony with GNSS/PPS are used just as tools to adjust the clock, not to control the clock with NTP.
This guide assumes that kernel level PPS is supported. If you have a modern distribution this should not be a problem, but for example some old CentOS distributions do not have kernel level PPS support. In this case special shmpps application with NMEA(20) and SHM(28) NTP drivers and special configuration might help you to get application level PPS support.
 In order to reach a good result, your machine should have an integrated serial port or at least a PCI-based serial port adapter for the PPS signal. If, e.g., a USB serial port adapter is in use, the synchronization accuracy will be much worse.
2. Step-by-Step Instructions for ntp #
2.1. Installation and Parameterization #
This section gives the instructions when you are using ntp. If you are using chrony, see the next section.
This section assumes that the serial port location is /dev/ttyS0 (an integrated serial port for PPS signal) and USB port is /dev/ttyUSB0 (for NMEA message reception). Port numbers may vary depending on your system, so please check and change them accordingly.
To install the required packages, type:
sudo apt-get install gpsd gpsd-clients ntp pps-tools setserialConnect the USB and serial cables. It might be useful to check in which port the USB device is attached:
dmesgTo start gpsd type:
sudo service gpsd startThen, check that GNSS reception is working:
xgpsYou should see satellites appearing. It might take few minutes initially (as long as 12 minutes in the worst case). Please wait until the fix is got. If nothing happens, exit the xgps and check that gpsd is using the correct USB port by typing:
sudo dpkg-reconfigure gpsd
sudo service gpsd restart
Sometimes you need to tell gpsd manually the device you intend to use. To do this, modify the configuration file at /etc/default/gpsd. There, add your device(s) to the device list, e.g.,
…
DEVICES=”/dev/ttyUSB0”
…
When the GNSS basic reception is working fine, enable the serial driver for PPS (18). In case there are several serial ports, please modify the port number /dev/ttyS<port> to match the correct one.
sudo ldattach 18 /dev/ttyS0/dev/pps0 device should appear. If there are several /dev/pps<port> devices or you want to ensure that the PPS is working type:
sudo ppstest /dev/pps0If you see output appearing every second, the PPS works. Press Ctrl+C to stop. If you don’t see anything after ok, found 1 source(s), now start fetching data..., please check the device is properly connected and port number is correctly selected.
Enabling the serial port low_latency mode can improve jitter:
sudo setserial /dev/ttyS0 low_latency Configure NTP by editing /etc/ntp.conf.
Disable the default servers by commenting them out, if you want to use only GPS time. Example:
# Use servers from the NTP Pool Project. Approved by Ubuntu Technical Board
# on 2011-02-08 (LP: #104525). See http://www.pool.ntp.org/join.html for
# more information.
#server 0.ubuntu.pool.ntp.org
#server 1.ubuntu.pool.ntp.org
#server 2.ubuntu.pool.ntp.org
#server 3.ubuntu.pool.ntp.org
Add the following lines:
#PPS
server 127.127.22.0 minpoll 4 maxpoll 4
fudge 127.127.22.0 flag2 0
#SHM
server 127.127.28.0 prefer
fudge 127.127.28.0 time1 0.55 refid GPS
Again, if the /dev/pps<port> device number is not 0, you should modify the number in PPS lines accordingly. Example (PPS device /dev/pps1):
#PPS
server 127.127.22.1 minpoll 4 maxpoll 4
fudge 127.127.22.1 flag2 0
Start the NTP
sudo service ntp start2.2. Checking the Status #
Wait for the clock to be synchronized. To check the status type:
ntpq -pTypical outputs are presented next.
-
The clock is correctly synchronized (see the marks o and *):
remote refid st t when poll reach delay offset jitter ============================================================================== oPPS(1) .PPS. 0 l 11 16 377 0.000 -0.011 0.019 *SHM(0) .GPS. 0 l 42 64 377 0.000 6.741 15.645 -
Not (yet) synchronized. Please wait or recheck the configuration. Also, if the clock is off too much, NTP could refuse synching. In this case, do initial synching manually.
remote refid st t when poll reach delay offset jitter ============================================================================== PPS(1) .PPS. 0 l - 16 0 0.000 0.000 0.000 SHM(0) .GPS. 0 l - 64 0 0.000 0.000 0.000 -
SHM only synchronized. Please wait for the PPS sync or recheck the PPS configuration.
remote refid st t when poll reach delay offset jitter ============================================================================== PPS(1) .PPS. 0 l - 16 0 0.000 0.000 0.000 *SHM(0) .GPS. 0 l 3 64 1 0.000 -14.525 0.000 -
Clock sources dropped as falseticker due to poor accuracy. Please check that the GPS signal is strong enough and restart NTP.
remote refid st t when poll reach delay offset jitter ============================================================================== xPPS(1) .PPS. 0 l - 16 0 0.000 0.000 0.000 xSHM(0) .GPS. 0 l - 64 0 0.000 0.000 0.000 -
No PPS clock. Please check that PPS (22) is enabled in ntp.conf and that NTP has PPS driver support.
remote refid st t when poll reach delay offset jitter ============================================================================== *SHM(0) .GPS. 0 l 3 64 1 0.000 -14.525 0.000 -
NTP not running:
ntpq: read: Connection refused
3. Step-by-Step Instructions for chrony #
3.1. Installation and Parameterization #
This section gives the GNSS positioning setup and timing synchronization instructions when you are using chrony.
In the following instructions, it is assumed that the PPS signal is connected to the device’s integrated serial port at /dev/ttyS0, and NMEA messages are received through a USB-serial converter via /dev/ttyUSB0. Port numbers may vary depending on your system, so please check and change them accordingly.
If you have ntp installed and you wish to start using chrony, remove ntp first. To install the required packages, type:
sudo apt-get install gpsd gpsd-clients chrony pps-tools setserialJust in case, if gpds was already installed, and is running, stop it:
sudo systemctl stop gpsd
sudo systemctl stop gpsd.socket
Set the NMEA message reception speed correctly according to your settings, e.g., 4800 bauds:
sudo stty -F /dev/ttyUSB0 4800Start gpds manually:
sudo gpsd -n /dev/ttyUSB0Now you should be receiving the NMEA message data. Check it:
cgpsYou should see something like the following:
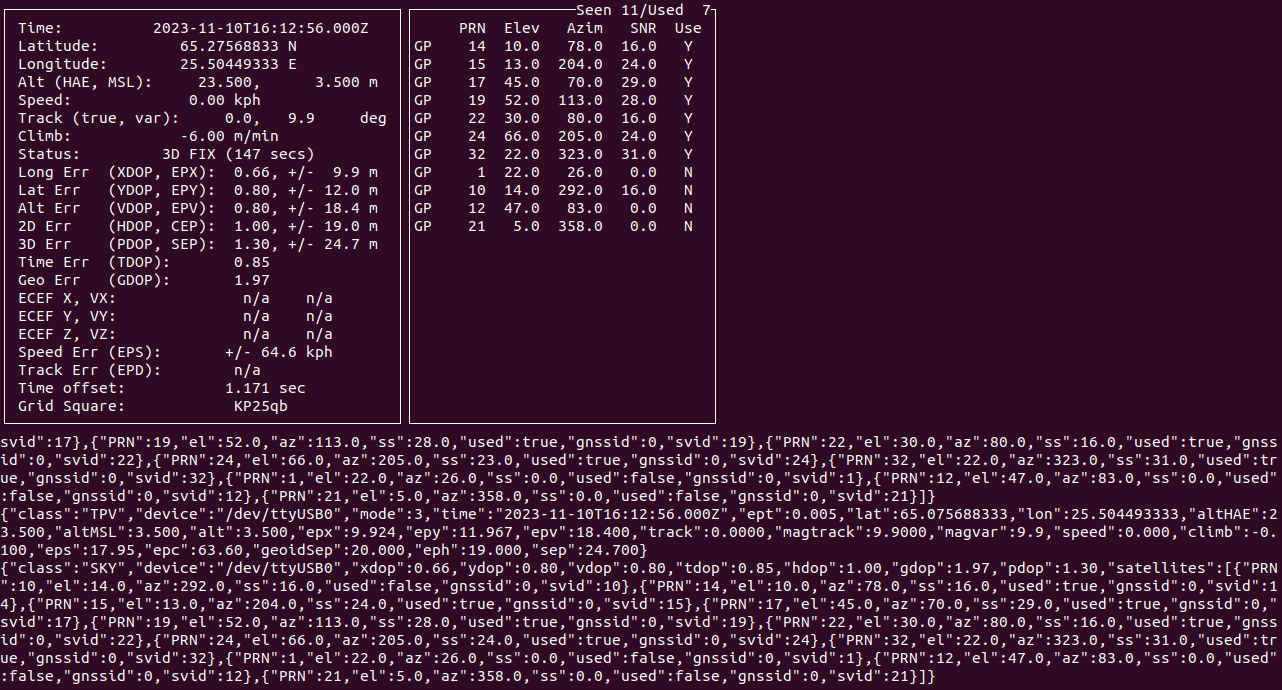
The messages in the lower part of the terminal show the NMEA data. The upper-right box lists the found satellites, and the upper-left box shows the data extracted. If you don’t see any data, check the connections and the previous steps.
If you do get data, check that the Status in the upper-left box shows fix like in the example figure. If you don’t have fix yet, wait for it. It will take some time to synchronize with GNSS (as long as 12 minutes in the worst case during the cold start). After you get fix, you also get the location and the time information shown in the upper part of the box.
Now, you have successfully set up the GNSS positioning for your device. When parameterized, Qosium Probe can read location directly from gpsd. Next, we will configure clock synchronization and start with PPS. Attach a line discipline to the PPS serial port to create a PPS source:
sudo ldattach 18 /dev/ttyS0The PPS source will appear as a new device, typically: /dev/pps0. However, sometimes there might already be PPS devices in the device list. The newly created PPS source will be the last of the PPS devices shown in the device list. To check the device list, type:
ls /devTo verify that you are receiving the PPS data, e.g., for /dev/pps0, type:
sudo ppstest /dev/pps0When it works, you see the timestamps for the rising and lower edges of the PPS pulse arriving once per second. If you don’t, check the connections and the previous steps.
Enabling the serial port low_latency mode can improve jitter:
sudo setserial /dev/ttyS0 low_latency Now we are ready to configure chrony. Open the configuration file /etc/chrony/chrony.conf for editing and add there the following lines:
refclock PPS /dev/pps0 lock NMEA
refclock SHM 0 offset 0.5 delay 0.2 refid NMEA noselect
The first line ties the reference clock to a PPS source at /dev/pps0 and locks it to another reference lock, called NMEA, providing the full time. The second line parameterizes the NTP shared memory driver, SHM, capable of receiving timing samples from another processes, like gpsd now. The first parameter is the shared memory segment being 0, typically. The rest of the parameters are:
- offset (seconds): specifies a correction if there is a delay in the time source. Now, we only need to hit the correct second, so setting 0.5 seconds here decreases the likelihood of locking to an incorrect second.
- delay (seconds): sets the NTP delay of the source, relating to the source selection algorithm.
- refid: specifies the reference ID of the refclock. We have now set here NMEA for convenience, but it is not a reserved name. You can set there any four-ASCII character ID you wish, but remember to refer to the same ID in the PPS reference clock.
- noselect: means that this source is never selected as the dominating source for clock synchronization.
Start the chrony service:
sudo systemctl start chrony3.2. Checking the Status #
Now, everything should be operational. You can check the situation with instructions:
chronyc sources -vWhen synchronization is working, you should see something like the following:
210 Number of sources = 2

  .-- Source mode  '^' = server, '=' = peer, '#' = local clock.
 / .- Source state '*' = current synced, '+' = combined , '-' = not combined,
| /   '?' = unreachable, 'x' = time may be in error, '~' = time too variable.
||                                                 .- xxxx [ yyyy ] +/- zzzz
||      Reachability register (octal) -.           |  xxxx = adjusted offset,
||      Log2(Polling interval) --.      |          |  yyyy = measured offset,
||                                \     |          |  zzzz = estimated error.
||                                 |    |           \
MS Name/IP address         Stratum Poll Reach LastRx Last sample
===============================================================================
#* PPS0                          0   4   377    17   +589ns[+1251ns] +/-  486ns
#? NMEA                          0   4   377    15    +41ms[  +41ms] +/-  104ms
As seen, there is * next to PPS, meaning it is now in use and working. The ? in the NMEA line only means that it is not in use, but as there are samples received, PPS has initially used it to fetch the full time. Otherwise, PPS would not claim to be synchronized. You might also see some NTP servers below, depending on your chrony configuration, but they are not in use either because of our chrony settings. If you do not get sync for PPS after a while, check your cables, settings, and the earlier steps.
3.3. Major Differences #
One more thing: in normal operation mode, chronyd corrects the system clock time gradually. That is at its best in fine-tuning, i.e., when the clock synchronization error is minor. If, however, the system clock differs considerably (minutes) from the GNSS time, the normal process might be too slow. Clock synchronization can take too much time. In these cases, you can speed up the process by allowing chronyd to make a large correction in the clock at once. To do that, use makestep directive, i.e.,:
sudo chronyc makestep 1 -1Glossary >
Global Navigation Satellite System
A general term under which all the different global satellite navigation systems (e.g., GPS, GLONASS, Galileo, BDS) fall.
Pulse per second
A square-like electrical signal that is used in accurate clock synchronization
Network Time Protocol
A very common protocol for synchronizing the clocks of devices across a network.